Mastering the Art of Pistol Grip: How to grip a pistol
For this installment, I’m going to talk about 5 easy fundamentals of how to establish a proper pistol grip. Your pistol grip is the body’s interface with the tool, in this case, a firearm, and in the case of a pistol, you only have at most two points, your right and left hand; how it fits and feels to the individual user is crucial to optimizing your performance. Said in more familiar terms, it’s like the importance of choosing the right-fitting shoes for comfort and performance.
Unlike a rifle or shotgun, where you have your shoulder and face (cheek weld) as two more points of contact and are generally easier to shoot, a pistol is a difficult firearm to master. I would say that if you become a proficient pistol shooter, you will automatically be proficient with a rifle.
So, how do you grip a pistol correctly? The goal is to create friction between your hand and the pistol. The only way to do that is to put as much skin against the pistol grip as possible without interfering with the function of the gun. First, you need to understand what a proper grip is and is not. Second, I know there are a zillion posts and videos like this one explaining grip. Still, I’ve also noticed very few get into the “why” of their explanations, which is critical to applying the lessons of a proper grip. Without understanding the “why,” you’re less likely to be able to diagnose yourself and make corrections correctly.
Easy fundamentals of how to grip a pistol – Step #1
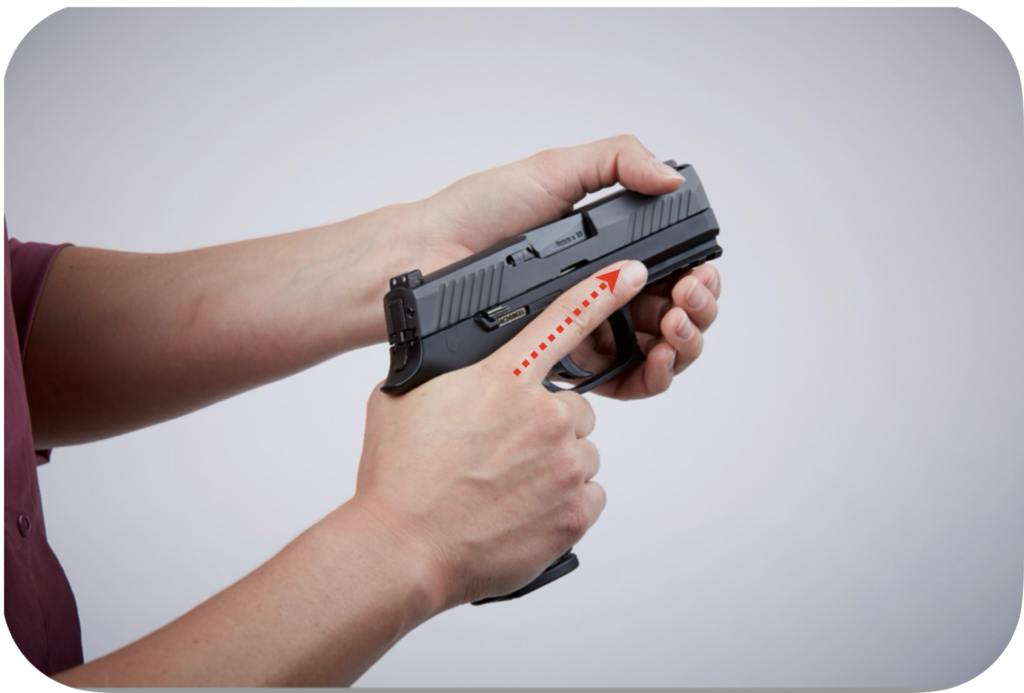
OK, so let’s get into it. The ideal grip will start with the primary hand as high up on the backstrap as possible. The web of the hand between your thumb and index finger is the part that will press into the pistol’s backstrap, similar in feel to shaking someone’s hand firmly. Your index finger should extend alongside the frame of the pistol, above the trigger guard – not on the trigger or inside the trigger guard – and the remaining fingers should wrap around the grip’s front strap. You should feel the middle portion of your middle finger firmly under the trigger guard.
PROPER HIGH GRIP WITH TRIGGER FINGER ALONGSIDE FRAME
Let’s get into the why. It was to do with Newton’s 3rd law again. You know the one about for every force, there’s an equal and opposite force. Although this applies to revolvers, the concept is essential for semi-automatic pistols because, unlike revolvers, semi-automatic guns have a reciprocating mass in the form of a slide that moves back and forth with each shot.
The slide’s mass and speed directly affect the perceived muzzle flip you feel when you fire the gun. After the gun fires, the slide moves to the rear, and when it reaches its full rearward range, you’ll notice in many slow-mo shots that’s when the muzzle really comes up. Conversely, as the slide moves back into battery, by loading the next cartridge and locking into place, the muzzle will tend to dip down.
So why is all that mumbo-jumbo you just read important? If your interest is in bulls-eye shooting, it might not be that important to you because speed is not that much of a factor in that discipline. However, in the context of personal protection and self-defense, where most of my articles will be focused, speed and reasonable accuracy of shots on the threat are what will end a violent confrontation in your favor. The only way to mitigate those reciprocating forces and recover from one shot to the next as quickly as possible is by establishing a proper and consistent grip.
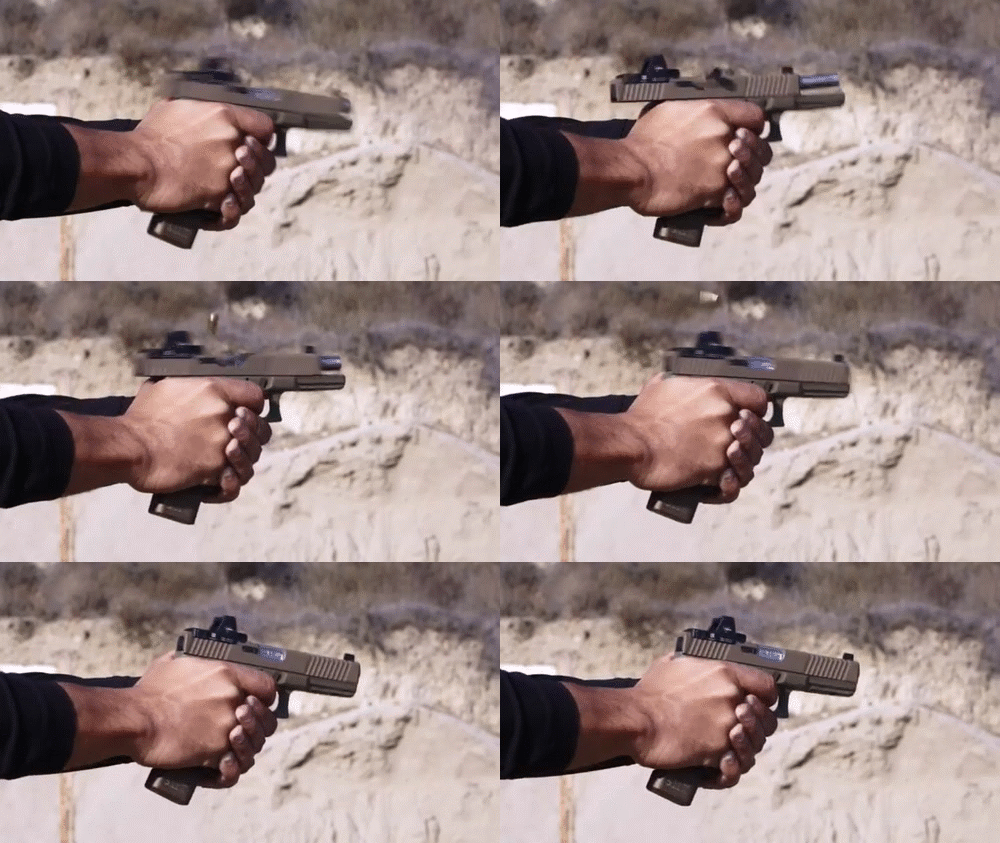
Gripping the backstrap high allows the gun to sit as low as possible in your hand, lowering the gun’s center of gravity. The lower the pistol sits in your hand, the more you can control the recoil and muzzle flip. There’s no way to eliminate it completely; it’s physics. All we can do is mitigate and manage the forces generated by each shot. Proper grip and recoil mitigation effectively allow the sights and barrel to rise and come back to your original point of aim more quickly. The more effectively this chain can be managed, the faster you will be able to recover and fire again.
Easy fundamentals of how to grip a pistol: Step #2 – Can You Reach the Trigger?
Once you’ve formed your proper grip, the next thing to do is to ensure how well you can manipulate the controls with the firearm, the most critical being the trigger. The grip can feel great, but if you can’t reach the trigger, it won’t do you much good if you can’t fire it. It goes without saying, but I’m going to say it anyway: Make sure the gun is empty before putting your finger on the trigger.
- Remove the magazine first
- Lock the slide to the rear
- Ensure nothing is in the chamber of the barrel and the magazine well is empty
- REMEMBER – Remove the source of the ammunition first (i.e., magazine) first. A common mistake with terrible consequences is when someone ejects the live round from the barrel first and then removes the magazine second. All they did was eject the live round and load a new round from the magazine into the chamber, leaving the firearm still loaded and absolutely still dangerous.
The middle of the first pad of your finger should be able to contact the trigger. You can have more finger contacting the trigger if you have longer fingers, but at a minimum, the first pad. If you can’t, it’s either time to move on to another model/brand or try and find some solutions.
Additionally, traditional teaching is that there should be a slight gap between the trigger finger and the frame of the gun to allow the finger to move freely. Typically, I see this when shooters with smaller hands have to reach too far for the trigger. Having said that, I’ve found that although not ideal, it’s possible to shoot well even if the finger rubs along the side. I know this because when you are issued pistols, you’re not really allowed to modify them, so as instructors, we have to try all kinds of creative ways to improve our agent’s firearms proficiency and qualification scores.
It’s not something I would recommend, but some people absolutely want to carry a certain kind of gun, for their own reasons and if you’re paying me to teach you, it’s my job to get you proficient in that platform.
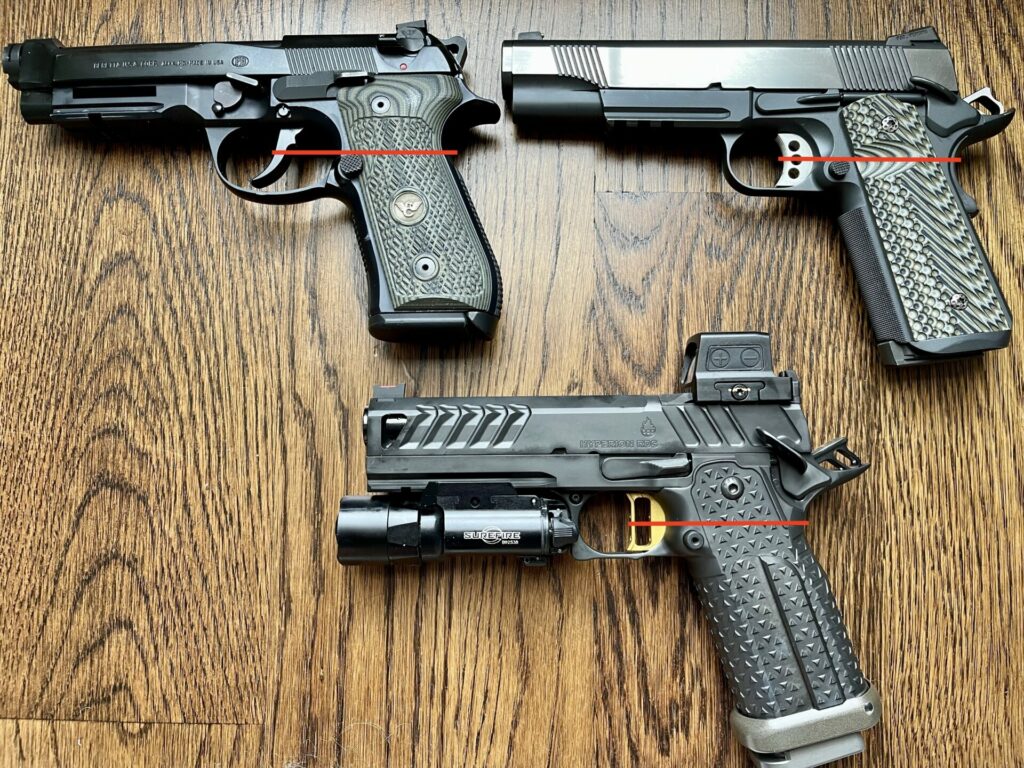
The first step in problem-solving trigger reach is to determine what is causing the issue. Is the grip too wide (left and right, front to back, or both)? Does the backstrap cut into the web of your hand? My wife has a problem with the latter with some guns, and the discomfort makes it hard to reach the trigger without pain.
More and more guns offer the ability to change the grip size in the form of different-sized backstraps that come included. If you can modify the grip, experiment with that first. If your grips are removable, you may be able to purchase aftermarket grips in a thinner variant than stock from different vendors. Check out the Gear page for links to brands I use and endorse.
Some brands have the option to install factory short-reach triggers which can make reaching the trigger easier by reducing the overall reach. However, when you start replacing and/or modifying the action of a firearm, it’s no longer a DIY solution for most people, which means added expense to pay a gunsmith to install the part(s). You might get lucky and have an adjustable trigger on your gun, although most self-defense pistols don’t have this option. If you do, it’s generally in the form of a screw accessed through the front face of the trigger that you turn to move the trigger forward or back, giving you a few millimeters of adjustment.
If those two suggestions don’t work, it might be better to consider a different model and/or brand.
Easy fundamentals of how to grip a pistol: Step #3 – Support Hand Grip
The next thing we must address is the other hand supporting the gun. Some call it your support hand, secondary hand, or weak hand. I don’t use the term “weak” because the support hand is very important in controlling recoil and movement and should be anything but “weak.” In fact, most shooters with grip and recoil management problems have them because of a “weak” grip.
To understand the role of the support hand, we need to reference what we discussed before regarding the high grip to control the reciprocating mass of the slide. The support hand must also be as high up on the gun as possible. My rule of thumb is that the support hand should be as high up as possible without interfering with the controls or movement of the slide.
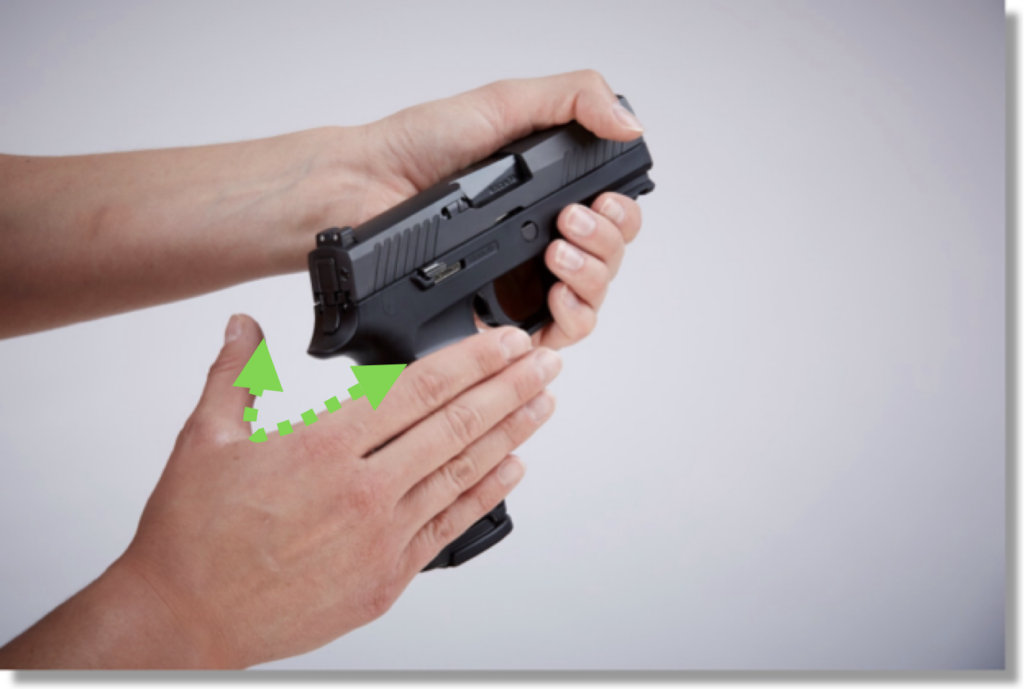
OK, so let’s get into how we do all this. At this point, I’m going to assume you’ve already established your shooting hand grip. Next, I want you to look at the side of the gun where your support hand will go, but don’t put your hand in the open space of the grip just yet. The next step is pointing your shooting hand’s thumb up like you are hitchhiking (Note: The pic below doesn’t show the thumb pointing upward). I want you to look at the open space that’s created and the outline of the edge of your shooting hand in relation to the grip.
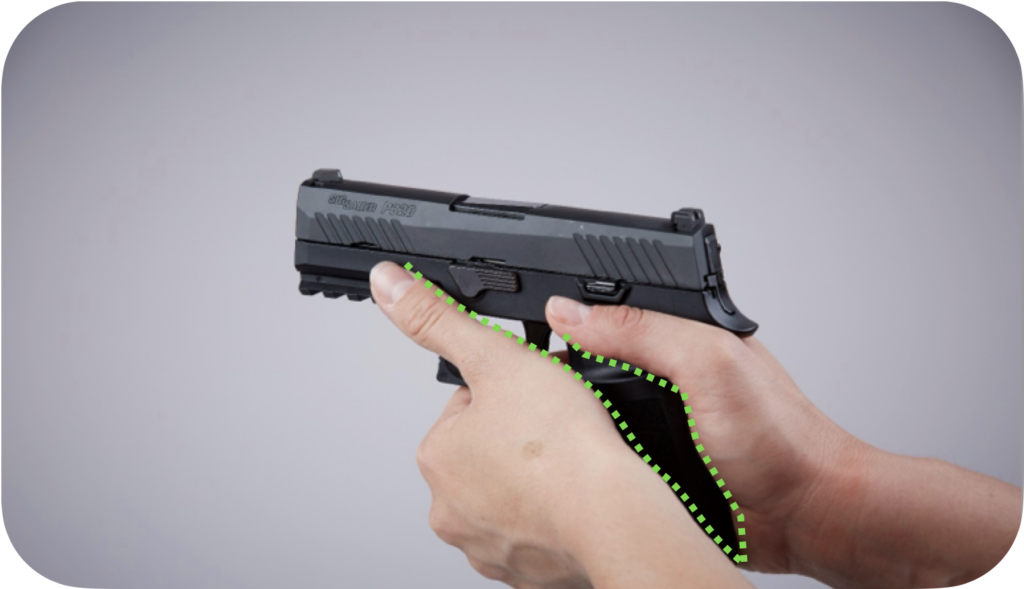

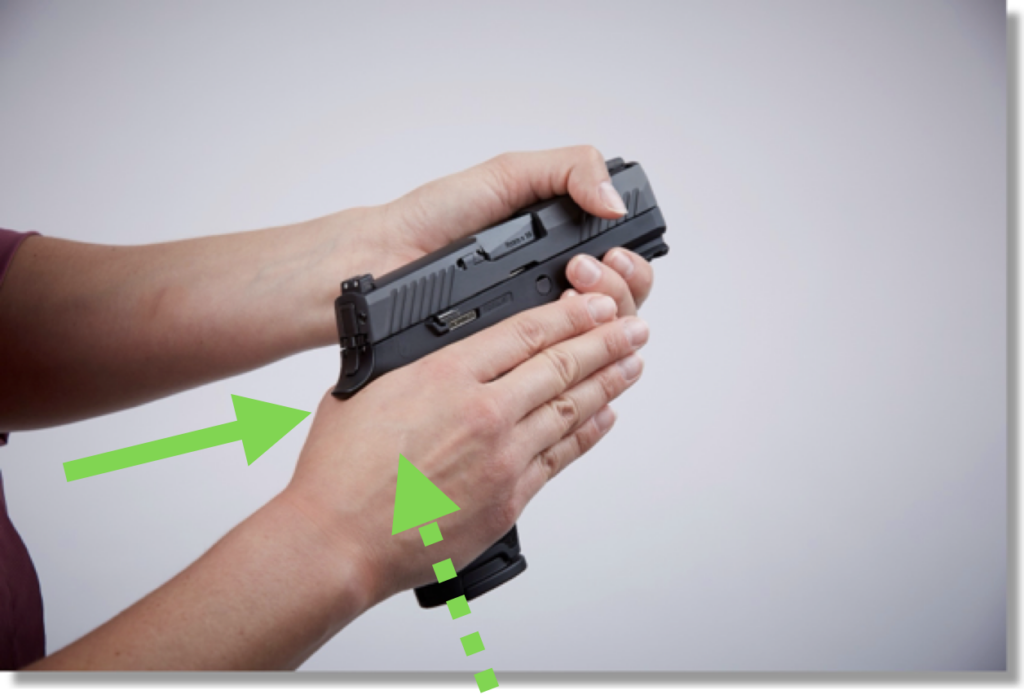
The space you see is the area you want to fill with your support hand, keeping in mind to place it as high up on the gun as possible without interfering with the controls or slide movement. To do that, you will likely have to pivot your fingers down, which will rotate the meaty part of your thumb/palm higher on the pistol grip.
A quick note on contacting the slide; touching or feeling the slide move along your hand is not wrong and won’t hurt your hand. It only becomes a problem when the shooter presses into the slide so hard that it causes the gun to malfunction. With that said, a high pistol grip may touch the slide, depending on the size of your hand and gun. That’s OK.
For a proper two-handed pistol grip, I start by placing my support hand palm in the space my shooting hand created (Reminder: fingers pivoted down at @25º-45º angle), matching both hands’ contours like a puzzle (remember to keep your shooting hand thumb up as you do this).

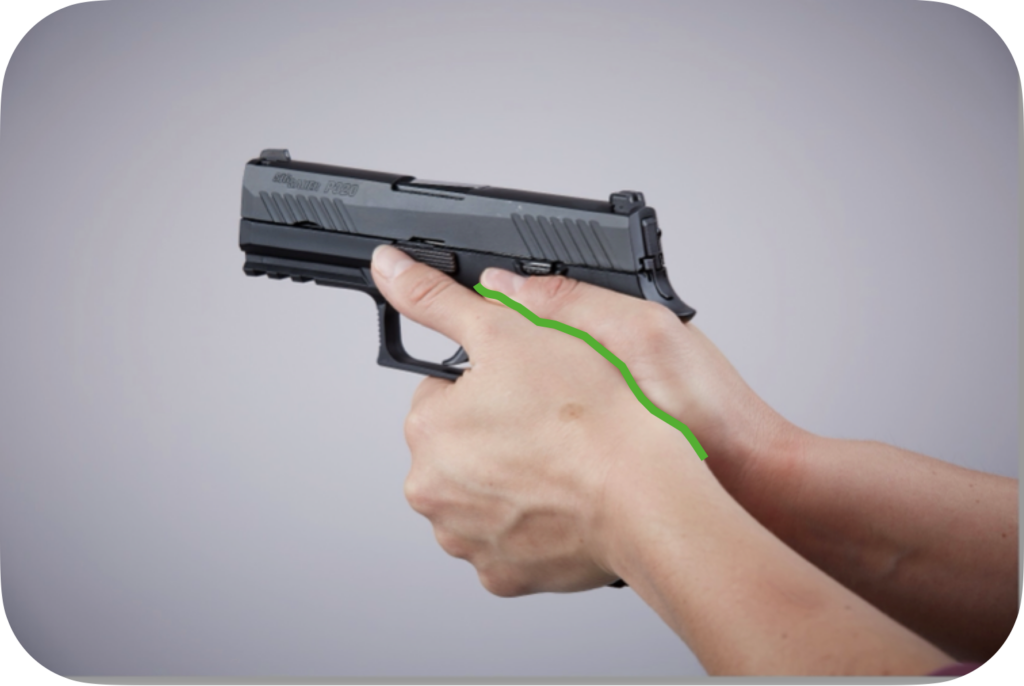
Next, I wrap my fingers under the trigger guard, ensuring contact of your support side index finger (somewhere between your middle knuckle and big knuckle) along the underside of the trigger guard. The consistent position of your hand on this spot will be significant later in this article for a proper grip.
Easy fundamentals of how to grip a pistol: Step #4 – Grip pressure
Now that you have a proper two-handed grip, I want to address grip pressure. At the beginning of my career in the government, the firearms instructors taught a 60/40 or 70/30 grip, meaning 60% of your grip should be coming from the support hand and 40% from your shooting hand. The idea was that gripping with less pressure allows you to manipulate your trigger finger better. There is truth to that, however it depends on the type of shooting you will be doing.
Generally, I recommend lighter grip pressure if accuracy is paramount (i.e., bulls-eye shooting) because generally, the more accurate your fire, the more time you have, so recoil management isn’t as necessary. What is necessary is trigger feel and mitigating any unnecessary influence on the gun.
However, in defensive shooting, bulls-eye accuracy is not the goal. Putting as many rounds in an upper torso-sized area as quickly as possible is the goal. That means multiple shots are fired in quick succession, and your ability to control the recoil of each shot will determine how quickly you can fire your next shot accurately. Hopefully, you’re ahead of me and can already guess that grip or, more specifically, grip pressure is what will help you mitigate the effects of recoil.
Your grip pressure will increase as your proficiency, coordination, and skills increase. You won’t have to think about differential grip pressures, just grip it hard with both hands and shoot.
Easy fundamentals of how to grip a pistol: Step #5 – Learn the feel of a proper grip
I know this next part sounds a little confusing, but I will say it anyway. What I explained on how to grip the pistol properly is a method to see and feel a proper grip. It is not how I’d recommend establishing your grip from the holster during a draw. I will explain how I teach “establishing your grip” in another tutorial because this one has already gotten too long.
In handling firearms, especially the grip, there are essential points of contact when gripping the pistol that will tell you, by feeling, that you have a proper grip. In the firearms industry, they are called “Index Points.” On the shooting hand, common index points will be the backstrap and the web of the hand, and the between the middle and far knuckle of the middle finger. Where exactly those two points will be are going to be different for each person depending on your hand size and finger length.
For the support hand, the placement of the meaty part of the thumb and the second index along the pointer finger, normally between the big knucle and middle knuckle. Some shooters will put something like skateboard tape on the side of the frame so they consistently place their thumb in the correct index spot.
You might find index points that work better for you to establish a proper grip. The bottom line is that your pistol grip has to be consistent. Shooting is all about consistency, and it begins with a proper grip because when it comes time to the draw, it all starts when your hand comes into contact with the pistol grip. If that doesn’t happen consistently, it will have a cascading effect on the rest of your draw and will eventually result in your sights not being in the place you expect them to be and possibly your trigger finger being out of position.
It becomes very noticeable if you shoot with a red dot optic because optics lack some of the visual index points that iron sights have, and you’ll waste time looking for the dot. More about pistols and optics in a future article.
You might be wondering what the point of this article is if I don’t recommend the steps outlined above during a self-defense situation. The article is essential because you must build a solid foundation before moving on to more complex and dynamic skills, and that means you have to know what a good pistol grip looks like and, more importantly, feels like before learning to consistently establish what is oftentimes referred to as the “master grip” when drawing from the holster.

